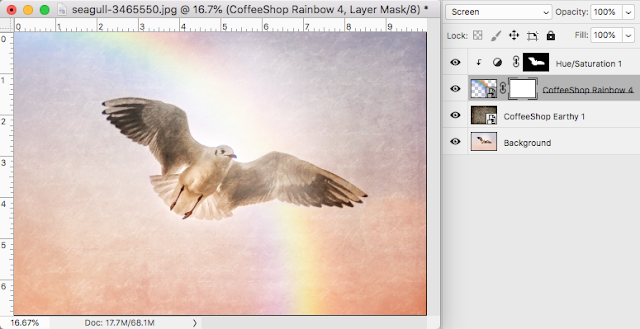
Today I am so excited to release my newest Rainbow overlay set and step-by-step tutorial for Photoshop/PSE. I will show you how I add these rainbows behind subjects in a image and make them blend in flawlessly. I really love this type of editing and I hope you enjoy creating your own rainbow art!
I also wrote a tutorial how I designed these rainbow overlays in Photoshop, it should be posted later this week.
You can grab the full-sized print (ready to frame!) of this Rainbow Gull that I created for this tutorial. The original gull, couple, flowers, and landscape images I used in this post can be found at Pixabay.
CoffeeShop "Deluxe Rainbow Overlay" Tutorial for Photoshop/PSE:
Open your image. You can download this seagull image if you want to follow along with this tutorial.
Add the texture. In this case I used one of my new favorites, CoffeeShop Earthy 1. Who am I kidding, I love all of my textures as I am a Texture Addict... ;-)
I put the texture in Overlay blending mode, 100% opacity. You can also try Soft Light or a combination of the two.
Drag the rainbow overlay over your image and position and resize it to fit.
Put the Rainbow layer in Screen blending mode. If that doesn't give you the look you want, try Multiply, Soft Light, or Overlay and adjust the opacity to taste. :-)
As you can see, the rainbow's colors are on the front of the bird and the light is bleaching out the bird's feathers. I want the rainbow to appear to be behind the bird, and this is an easy fix!
Add a Hue/Saturation layer on top of the rainbow.
Clip it to the rainbow layer. To do this, hold down the alt/option key while holding the mouse cursor between the two layers. When you see a little white box show up, click on it and the Hue/Saturation layer will be clipped to the rainbow layer below it.
Click to open the Hue/Saturation layer and move the saturation slider to -100. This will remove all of the rainbow color as seen above.
Click on the Hue/Saturation's layer mask and fill it with black.
Using a soft white brush, gentle paint the Hue/Saturation desaturate layer back onto the bird. If you want to see where you have removed the color (the red background as seen above), simply click the "/" key to toggle back and forth.
Now the rainbow colors are removed from the bird and I will paint back some of the contrast.

Add a layer mask to the Rainbow layer.
And use a soft black low-opacity brush to remove the rainbow's light from the bird.
I think this looks perfect! I want to show you one more edit.
You can download the original couple image to follow this tutorial.
Run the CoffeeShop "Chamomile Tea" action. Adjust layers to taste.
Add the Rainbow overlay.
Put the rainbow layer in Screen blending mode and adjust the layers to taste.
Add a layer mask to the Rainbow layer and use a soft black low-opacity brush or white-to-black gradient brush to remove the rainbow from the foreground of the image (in this case the lower left side).
Pretty, right?
I would love to see your edits using these rainbow overlays and my tutorial on my Facebook page! I have also written a tutorial on how I made these rainbow overlays in Photoshop and I will post that later this week.
Download the CoffeeShop "Deluxe Rainbow Overlay" set!
Do you want to download my favorite CoffeeShop PSE/Photoshop Actions and Lightroom Presets or Design Elements in one convenient zipped file AND help support this blog? Just click here for my action pack or here for a download of some of my most popular design elements, storyboards, and textures.
For complete info on installing all of my actions, click here.
Facebook | Instagram | Pinterest | Twitter
from The CoffeeShop Blog https://ift.tt/2LmfWNE


No comments:
Post a Comment